The user management page lets you add, disable, and manage user accounts.
The statistics tab shows information about users and usage of Collaborator:
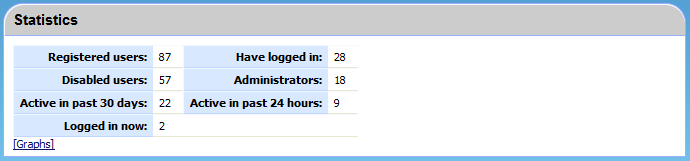
This can help monitor your usage and determine how many seats are necessary.
This form lets you create new users in Collaborator. If you are using LDAP authentication you will not see this form because users are created automatically when they first log into the system.
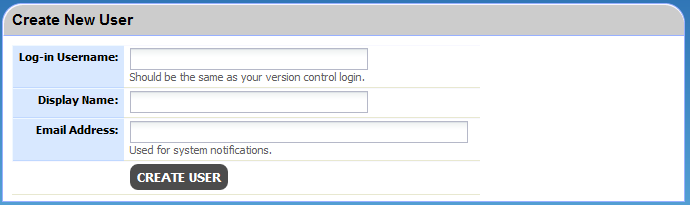
Login names must be unique in the system; Collaborator will not allow you to create a second user with the same login. The display name is used to denote the user in the interface. Typically, display name contains the user's full name, but may include any other information: initials, nickname, position, department, and so on. Email address is used for sending notification messages.
Note: If the E-Mail address includes non-latin symbols, type it inside quotation marks. For example, if you need to use the äddress@example.com address, input it as "äddress"@example.com.
Important: When creating new user accounts, it is a good idea to make the login name identical to the user's version control login. One advantage is that the user does not have to remember a new login. Another advantage is that certain features are enabled in Collaborator because it can correlate users from version control changelists with Collaborator users. Finally cross-system reporting becomes much easier when the logins are the same.
After you create a user you are returned to the same screen. This makes it easy to add multiple users quickly.
The user list shows every user in the system along with key information about each:
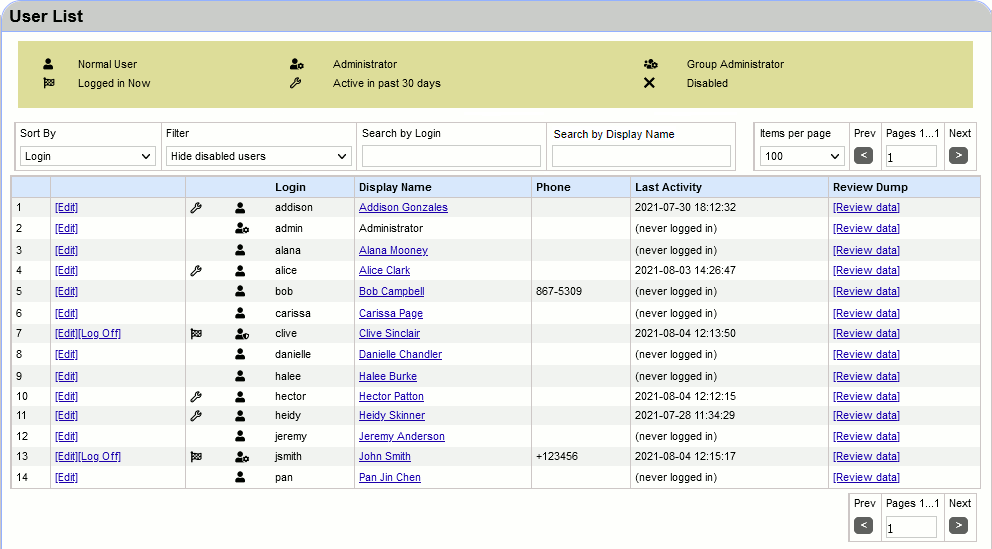
Here, the Last Activity column indicates the latest time when the user had performed any action within the Collaborator web UI.
You can sort the user list by:
| • | Login |
| • | Display Name |
| • | Last Activity (oldest first) |
| • | Last Activity (most recent first) |
You can filter the user list by:
| • | Show all users |
| • | Hide disabled users |
| • | Show only logged-in users |
| • | Show only administrators |
| • | Show users missing name |
| • | Show users missing email |
| • | Show users missing phone number |
Also, you can search for user logins or display names that contain the specified letters.
When your server has multiple users, the user list is divided into several pages. The controls above and below the user list allow to select how many items will be displayed per page and navigate to next and previous pages.
The [Edit]link allows you to update any user setting from basic contact information to personal display and notification settings. The [Log Off]link allows you to immediately log off a logged-in user. The [Review data] link allows to generate a dump with reviews of this particular user.
The first column of icons tells you several things about the user's recent activity and how the user is counting towards server licensing.
Icon |
Logged in? |
Consuming floating-seat license? |
Consuming fixed-seat license? |
|
Yes |
Yes |
Yes |
|
No |
No |
Yes |
(none) |
No |
No |
No |
The second column of icons tells you about the user's access rights:
Icon |
Description |
|
User with full administrator privileges |
|
User with group administrator privileges |
|
Regular user |
|
Disabled user. (Not allowed to log in and don't count in licensing.) |
You will notice that the admin account never counts towards licensing. This is one of the special characteristics of the System Administrator Account.
Administrators also have the ability to force a user to log out of Collaborator to make a seat available. To do so, just click the [Log Off] link that will appear to the left of the logged in username. This feature should be used carefully as the user will immediately be logged off. Once a user is forced out, the next time they access Collaborator, they will be required to reenter their username/password to gain access.
You cannot delete users in Collaborator because the user record is necessary for reporting and for viewing old reviews that they were a part of.
However you can disable a user. Disabling a user does several things immediately:
| • | The user can no longer log in. |
| • | If the user is already logged in, they are automatically and immediately logged off. |
| • | The user does not show up in standard user lists, like in list for inviting to a review. |
| • | The user will not receive any notifications or broadcast messages. |
| • | The user immediately does not count towards either floating-seat or fixed-seat licensing. |
The user will continue to appear in the general user list at the end, and an administrator can re-enable a user at any time.
To disable or enable a user, click the [Edit] link next to that user on the user list and change the "Is Enabled" flag:

Users with administrative access are allowed to access the "Admin" menu from the menubar and all screens therein. They also have a variety of other permissions described elsewhere in this manual, including but not limited to:
| • | Administrators can look at all reviews, regardless of whether they have been marked restricted. |
| • | Administrators can do anything with defects in any review: create, delete, edit, externalize, and mark fixed, regardless of their role or even non-participation in that review. |
| • | Administrators can edit characteristics of any review including changing custom field content, changing the list of participants, and canceling the review. |
To set or clear a user's administrative access, click the [Edit] link next to that user on the user list and change the "Is Administrator" flag:
![]()
Warning: Be careful if you are an administrator and you are editing your own user information. If you say that you are not an administrator, you are not from that point forward!
If you do this by accident it can be remedied by another administrator, or the System Administrator in particular (see below).
The Special "System Administrator" Account
One user account is special: The System Administrator Account. How do you know which account is this special one? If you are using internal authentication, the System Administrator Account is always called admin (this cannot be changed). If you are using LDAP authentication, the account is determined during installation.
The System Administrator Account has the following special properties:
| • | There can be only one. One to rule them all. |
| • | The System Administrator is always an administrator; administrative access cannot be revoked. (This is prevented in the user interface so you cannot revoke access, even by mistake.) |
| • | The System Administrator can always log in. Even if the server license has been exceeded, this account is still allowed to log in. |
Additionally to giving users full-fledged administrator privileges, you may grant some users with elevated permissions. Users with elevated permissions may perform specific actions over reviews, or may perform some of administrative tasks: manage user groups, templates, custom fields, checklists, roles, automatic links.
To assign a user as group administrator, open Groups category, click the [Edit] link next to the desired user group, scroll to the Group Administrators section and add the user to the list of group administrators.
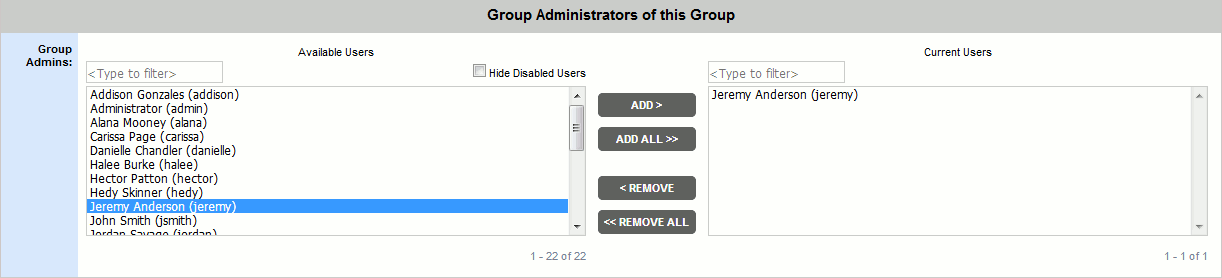
Group administrators are regular (not full administrator) users who are allowed to administer this group. Group administrators can edit group settings, add or remove user members of the group.
To set or clear a user's elevated permissions, click the [Edit] link next to that user on the user list, switch to the Permissions tab and change the appropriate flags:
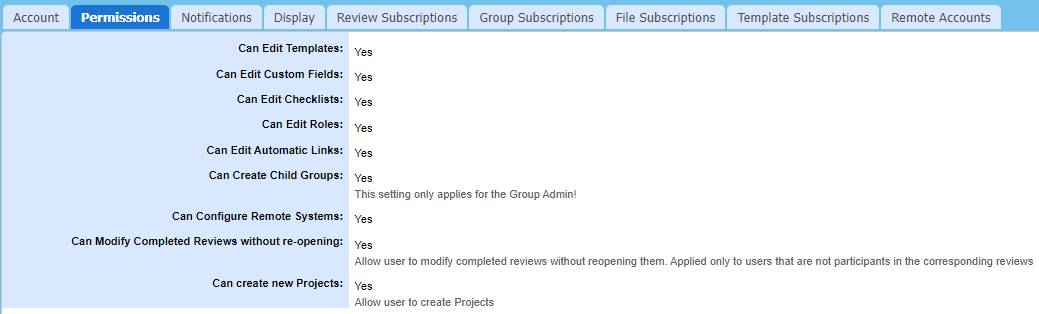
Once enabled, the user will become able to modify the respective categories of administrative settings, or perform specific actions over reviews.