This topic describes how to setup Collaborator integration with JIRA issue-tracking system. To learn general principles of how any issue-tracking integration operates, see Issue-Tracking Integrations: Overview.
| 1. | Open the Collaborator login page in a browser and log in to Collaborator as an administrator. |
| 2. | In Collaborator, go to Admin > General and ensure that server's External URL is valid and is accessible to JIRA server and vice versa. Configure a firewall or enable tunneled connections to do so. |
| 3. | Go to Admin > Integrations > Issue-Tracking Services |
| 4. | In the New Remote System Configuration section, select JIRA and click Create. This will display the configuration settings.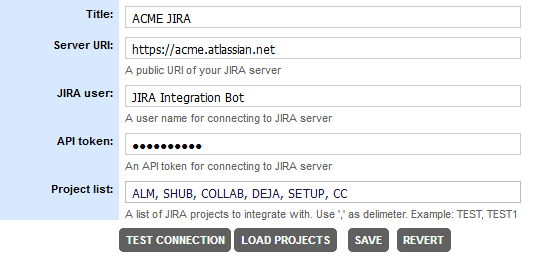 Specify the setting values: |
Setting |
Description |
Title |
The configuration name as it will be displayed in Collaborator's user interface. |
Server URI |
The JIRA server's URL and port. For instance: https://jira.acme.com |
The user name that Collaborator will use for connecting to JIRA. The specified user must have read-write permissions to all JIRA projects which you want to integrate with. Administrator permissions are NOT required. You may specify a regular user, or create a dedicated user for this integration. To learn how to restrict access to JIRA items based on individual user permissions in Atlassian, see the respective section below. |
|
API token |
The API token or password to use for connecting to JIRA. For JIRA Cloud (SaaS) instances you need to specify API token. To generate token, log in to https://id.atlassian.com/manage/api-tokens, click Create API token, specify token caption and click Create. See Atlassian documentation for detailed information about API tokens. For JIRA Server (on-prem) instances you need to specify password. |
After specifying these values, you can click TEST CONNECTION to verify if you entered data correctly.
Setting |
Description |
Project list |
A string containing the keys of JIRA projects to integrate with. Tip: Click LOAD PROJECTS to read project keys from the JIRA instance specified by the Server URI setting. Project keys are case-insensitive. The "Project List" field can contain up to 2000 characters. |
| 5. | After you specified the values, click Save. This will create and enable JIRA integration. |
| 6. | Switch to the Admin > Integrations page. The Integration Status section allows you to quickly enable or disable integrations with remote systems. |
| 7. | Locate the Enable JIRA Integration setting and verify that it is set to Yes. |
| 8. | Once the JIRA configuration is enabled, automatic linking for the specified remote systems will be enabled in all active templates. However, Collaborator administrators may enable or disable linking per each template through its Automatically Add Remote System Links setting. In this case, disabled issue-tracking systems will not be displayed in the review's Add Remote System Links section and ticket identifiers for these systems will be displayed as plain text rather than links. Besides that, administrators can enable the ability to export review defects to the selected issue-tracking system. To enable defect export, go to the Review Templates screen, edit the appropriate template, change the "Automatically Create New Work Item for External Defects" setting for that specific system field to "Enabled" and select which project will be pre-selected in the dialog that suggests creating a ticket/work item. |

To display review information on the JIRA side you need to install Collaborator plug-in on your JIRA instance and configure your projects to use that plug-in. The plug-in works with both JIRA Cloud (SaaS) and JIRA Server (on-prem) instances of JIRA.
Install plug-in on JIRA Cloud (SaaS)
| 1. | Log into your JIRA instance as an administrator. |
| 2. | Click the admin drop-down and choose Apps. |
| 3. | Go to the Manage apps section and click Settings. |
| 4. | In the following dialog, turn on the Enable development mode option and click Apply.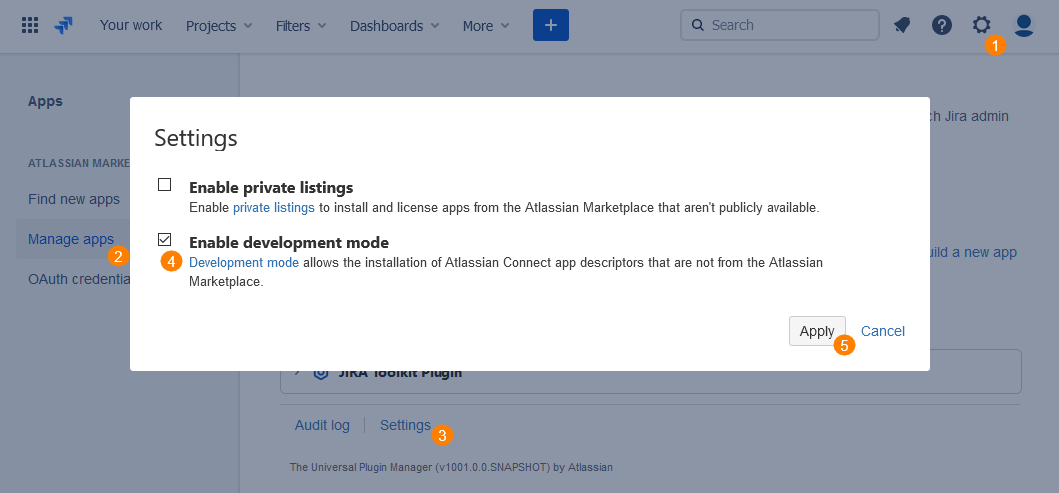 Enabling development mode |
This will allow to upload and install custom apps.
| 5. | Click Upload app button. |
| 6. | In the following dialog, specify https://collab-jira.smartbear.com in the From this URL field. |
| 7. | Click Upload to upload and install the plug-in. |

Installing plug-in on JIRA cloud
Once installed, the plug-in on will appear on the Manage apps page of the JIRA administration console.
Install plug-in on JIRA Server (on-prem)
| 1. | Visit the Collaborator JIRA Plug-in download page and get the most recent version of server plug-in. |
| 2. | Log into your JIRA instance as an administrator. |
| 3. | Click the admin drop-down and choose Manage apps. |
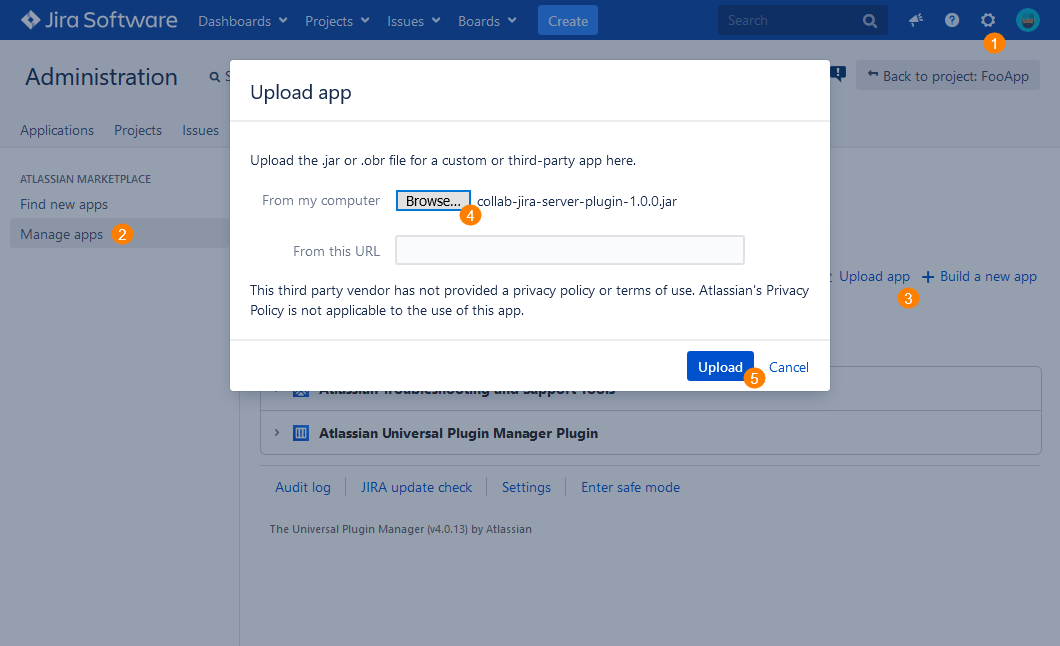
| 4. | Go to the Manage apps section and click Upload app. |
| 5. | In the following dialog, click Browse and specify path to the downloaded plug-in .jar file. |
| 6. | Click Upload to upload and install the plug-in. |
Once installed, the plug-in on will appear on the Manage apps page of the JIRA administration console.
Configure global Collaborator Integration settings
It’s possible to setup common configuration for JIRA-Collaborator integration, that can be used as a default configuration of plugin for all JIRA projects (there still is an option to override this configuration for specific project).
| 1. | Open Administration page and go to Applications. |
| 2. | Find Collaborator Integration section. |
| 3. | Specify the URL of your Collaborator server and credentials to use for connection. You can specify password or login ticket: |
| • | When single sign-on authentication is disabled, specify password. |
| • | When single sign-on authentication is enabled, specify login ticket instead. |
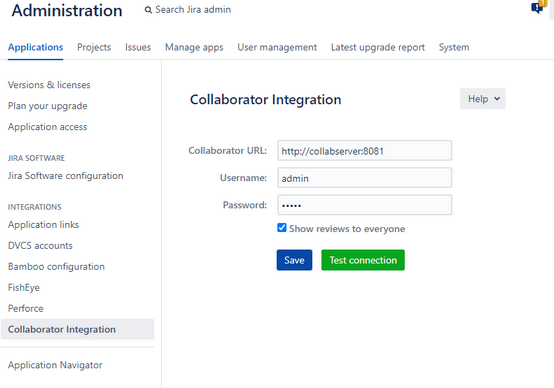
| 4. | Enable or disable the Show reviews to everyone option to control whether review information could be available to users that are not participants of that review: |
| • | If disabled (default), the Collaborator panel will contain links and statuses to all linked reviews, however detailed review information would be displayed respecting the Restrict Access to Review setting. |
| • | If enabled, the Collaborator panel will contain links and statuses to all linked reviews. This list will be visible to any JIRA user and would contain the following information: link to the review on Collaborator server, current status, list of participants and their roles. |
| 6. | Click Save. |
Now you need to configure your JIRA projects to display information about Collaborator reviews using the new plug-in. Collaborator JIRA plug-in provides flexible setup:
| • | disable plugin for projects where integration with Collaborator is not needed |
| • | use default configuration for projects |
| • | use project configuration |
For each project that should integrate with Collaborator, perform the following steps:
| 1. | Log into your JIRA instance as an administrator. |
| 2. | Select the desired project in the Projects drop-down list. |
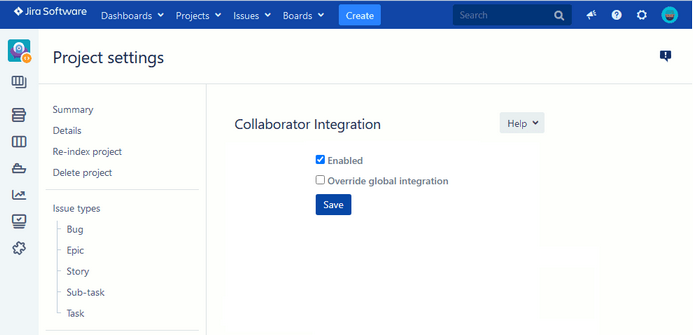
| 3. | Click Project settings and scroll to the Collaborator Integration section. |
| 4. | Click on Enabled checkbox to use integration for the current project. By default option is unchecked, so that integration with Collaborator is disabled. |

| 5. | After enabling integration new option Override global integration appears. |
| • | If option disabled (default) then global settings are used. |
| • | If enabled, project configuration can be set. |
| 6. | (Optional) Specify the URL of your Collaborator server and credentials to use for connection. You can specify password or login ticket: |
| • | When single sign-on authentication is disabled, specify password. |
| • | When single sign-on authentication is enabled, specify login ticket instead. |
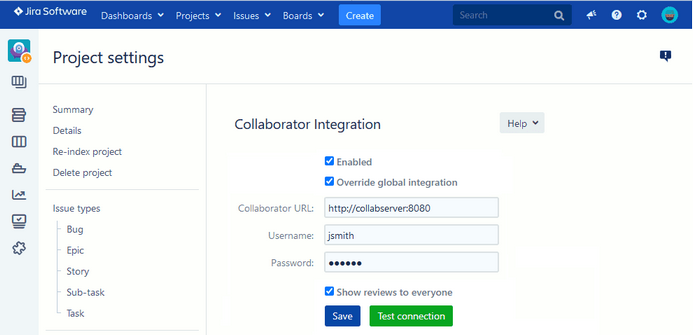
| 7. | (Optional) Enable or disable the Show reviews to everyone option to control whether review information could be available to users that are not participants of that review: |
| • | If disabled (default), the Collaborator panel will contain links and statuses to all linked reviews, however detailed review information would be displayed respecting the Restrict Access to Review setting. |
| • | If enabled, the Collaborator panel will contain links and statuses to all linked reviews. This list will be visible to any JIRA user and would contain the following information: link to the review on Collaborator server, current status, list of participants and their roles. |
| 8. | Click Save. |
To retrieve data from JIRA, Collaborator uses the account specified in the JIRA user field of integration settings. Typically this is a dedicated account having read-write permissions to all JIRA projects, or even an administrator account. Thus, Collaborator could potentially display JIRA items that are not available to regular users because of permission restrictions on the Atlassian side.
Administrators can use review template's Automatically Add Remote System Links setting to specify which JIRA instances should be available in reviews having the particular template. In this case, disabled issue-tracking systems will not be displayed in the review's Add Remote System Links section and ticket identifiers for these systems will be displayed as plain text rather than links.
To restrict access to JIRA items based on individual user permissions in Atlassian side, you should establish Atlassian Authentication and set the Restrict access to JIRA option to True. In this case for users who had signed in using their Atlassian accounts, Collaborator will display active links only to those JIRA items that are accessible to current user on the Atlassian side. While the items that are not accessible to current user will be displayed as plain-text.
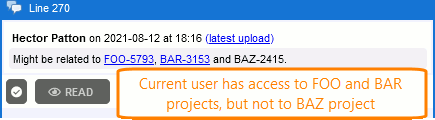
For users who had signed in using Collaborator's generic authentication, all JIRA items will be displayed as plain-text.
Establish trusted connection
When your on-premises JIRA Server use SSL connection, its certificates may not be trusted by Collaborator server. In this case you will need to import that certificate as trusted.
To establish trust, you need to import the public key of your on-premises server as a trusted certificate to Collaborator keystore file. Perform the following actions on the machine, where Collaborator server is installed:
1. Get the certificate file from your on-premises server or network administrator.
2. Locate the keystore file which you have generated while configuring Collaborator HTTPS connection.
Default location is <Collaborator Server>/tomcat/conf/collab.ks, yet that could be changed while generating keystore.
3. Use Java’s keytool utility to import the certificate in Collaborator keystore file. You can find keytool in the $JAVA_HOME/bin directory:
$JAVA_HOME/bin/keytool -import -alias on-prem-server -keystore <collab-keystore-path> -trustcacerts -file <certificate-file-name>
For more information on command-line arguments of the keytool utility, see keytool documentation.
4. ![]() Most likely you will be prompted to confirm the validity of the certificate. It is imperative for the security of the overall system that you verify the key matches the trusted material. Before accepting the certificate, you should contact the administrator that sent you the certificates and verify that the certificate fingerprints that you see match the certificate fingerprints that they intended to send you.
Most likely you will be prompted to confirm the validity of the certificate. It is imperative for the security of the overall system that you verify the key matches the trusted material. Before accepting the certificate, you should contact the administrator that sent you the certificates and verify that the certificate fingerprints that you see match the certificate fingerprints that they intended to send you.
5. The final step is to configure Collaborator to use the newly created keystore. Open the <Collaborator Server>/ccollab-server.vmoptions file in a text editor, and add the following lines to it:
-Djavax.net.ssl.trustStore=<collab-keystore-path>
-Djavax.net.ssl.trustStorePassword=<collab-keystore-password>
6. Restart the Collaborator server.
When your your Collaborator server uses a self-signed certificate or the certificate singed by an internal CA root, you will need to import this certificate as trusted to your JIRA server. Perform the following actions on the machine, where JIRA server is installed:
| 1. | Get the Collaborator server certificate file. You can obtain it from your Collaborator administrator, or use Java’s keytool utility. You can find it in the $JAVA_HOME/bin directory: |
$JAVA_HOME/bin/keytool -printcert -sslserver yourcollabserver_url:port -rfc >> collab.crt
| 2. | Use the same keytool utility to import the Collaborator server certificate as trusted: |
$JAVA_HOME/bin/keytool -importcert -alias collabserver -keystore $JAVA_HOME/lib/security/cacerts -file collab.crt
| 3. | Restart the JIRA server. |
Now the integration between Collaborator and JIRA is configured and running.