There are two ways to create a Bitbucket configuration: automatically via the Easy Add Repository wizard and manually via the Configure Remote Systems tab. The first approach is useful for adding new configurations, while the second allows adding new and modifying existing configurations. This section describes both of these ways.
Additionally, you can create auto-polling configuration to periodically look for new repositories on Bitbucket server and suggest creating integrations for them.
Important. In order to use integration, your Collaborator server must be accessible to the remote system and vice versa. Configure a firewall or enable tunneled connections to expose your local Collaborator server to the Internet.
Creating Bitbucket configuration via the Easy Add Repository wizard
| 1. | Open the Collaborator login page in a browser and log in to Collaborator as an administrator. |
| 2. | In Collaborator, go to Admin > Integrations > Repository Hosting Services |
| 3. | Switch to the Easy Add Repository tab. |
| 4. | Select Bitbucket in the the Add repository for combobox and click Next. This will display the Easy Add Repository wizard. It helps to setup remote repository configuration on the Collaborator side and add automatically the webhook on the Bitbucket side. 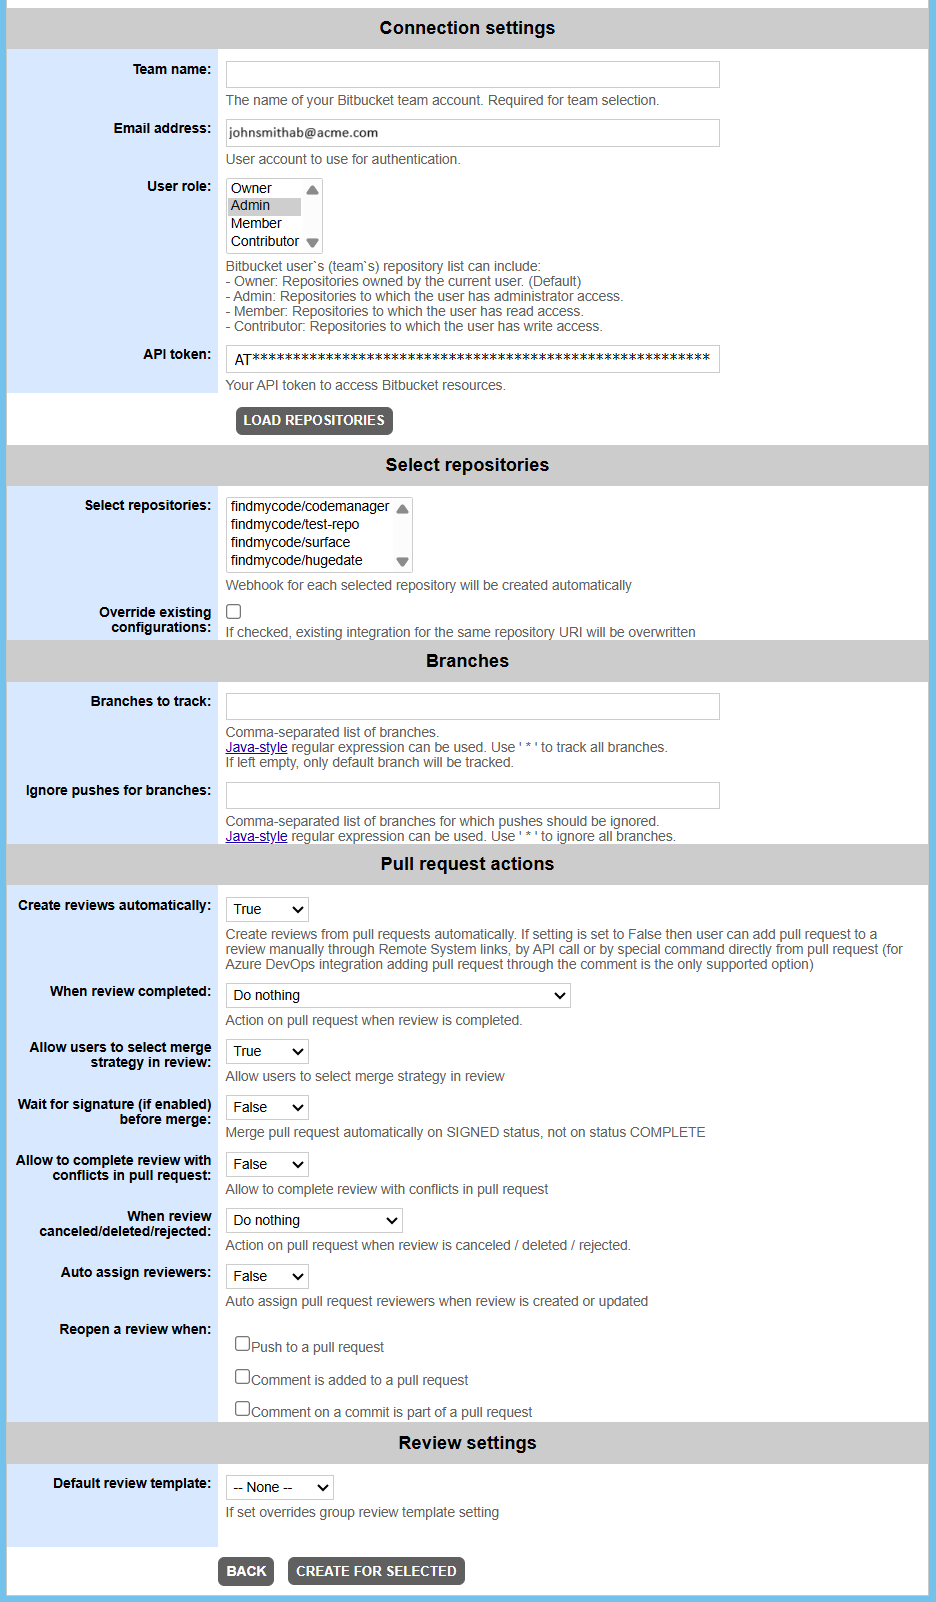 |
| 5. | Specify settings in the the following sections of the wizard: |
Connection settings
Setting |
Description |
Team name |
Required only for team owned repositories (https://bitbucket.org/TeamName/RepoName). Specifies the name of your Bitbucket team account (TeamName). |
User role |
Optional. Defines which types of repositories to track. Owner: Repositories that are owned by the specified user. (Default) Admin: Repositories to which the user has administrator access. Member: Repositories to which the user has read access. Contributor: Repositories to which the user has write access. Webhooks will be created for those repositories where allowed by the repository permissions for the specified user. |
Email address |
Required. A name of user account to use for authentication. For single-user repositories (https://bitbucket.org/UserName/RepoName), this should be the user' email address. For team owned repositories (https://bitbucket.org/TeamName/RepoName), this should be the user' email address who belongs to the desired team. |
API token |
Required. The API token for the Bitbucket account to be tracked. Read API token on Bitbucket documentation to learn how to create API token. For integration with Collaborator you need to enable Read, Write, and Admin permissions for Repositories category, Read and Write permissions for Pull requests & Read, Write and Delete permissions for Webhooks categories. |
After specifying connection settings, you can click Load repositories to retrieve a list of repositories available for the specified user or team.
Select repositories
Setting |
Description |
Select repositories |
Optional. Displays a list of repositories available for the specified user or team. Select which repositories you need to track. Use Ctrl+click or Shift+click for multi-selection. If any of the repositories were chosen, the wizard will display the Create for selected button below the settings section. If none of the repositories were chosen, the wizard will display the Create for all button below the settings section. |
Override existing configurations |
Optional. Specifies whether to override existing configurations that track the same repository URI. |
Branches
Setting |
Description |
Branches to track |
Optional. The names of branches to track changes and create reviews on pull requests and direct pushes. Separate multiple branch names with commas. You may use Java-style regular expressions to match specific branch names, or you may use the '*' wildcard (alone, or separated by comma) to match all branches. If this field is empty, main branch in the repository will be tracked ("main" for Git repositories and "default" for Mercurial repositories). |
Ignore pushes for branches |
Optional. Specifies branches for which Collaborator will not create reviews on direct pushes. You can enter one or several branch names. Separate multiple branch names with commas. You may use Java-style regular expressions to match specific branch names, or you may use the '*' wildcard (alone, or separated by comma) to match all branches. |
Pull request actions
Setting |
Description |
||||||
Create review automatically |
If enabled, reviews for pull request are created automatically. If disabled, user can add pull request to a review manually through Remote System links, by API call or by special command directly from pull request. |
||||||
When review completed |
Optional. Specifies what action to perform when a review corresponding to a pull request was accomplished. Do nothing: Do not perform any action. Merge pull request: Merge pull request that corresponds to a review. Merge pull request and close its branch: Merge pull request that corresponds to a review and then close the respective branch. Squash pull request: Squash and merge pull request that corresponds to a review. Squash pull request and close its branch: Squash and merge pull request that corresponds to a review and then close the respective branch. Merge and fast forward pull request: Merge and fast forward pull request that corresponds to a review. Merge and fast forward pull request and close its branch: Merge and fast forward pull request that corresponds to a review and then close the respective branch. To learn more about pull request merge strategies, see Bitbucket documentation. |
||||||
Allow users to select merge strategy in review |
If enabled, regular users would be able to choose pull request merge strategies in each separate review. If disabled, all pull requests would behave as specified by the "When review completed" setting. |
||||||
Wait for signature (if enabled) before merge |
Optional. Effective, if any of merge actions (merge or squash) was selected in "When review completed" setting. If enabled Collaborator will wait for the completed review to be signed off before merging the respective pull request. Otherwise, pull request will be merged immediately, even if the review have not been signed yet. |
||||||
Allow to complete review with conflicts in pull request |
Should it be possible to complete a review if there are conflicts in the respective pull request. |
||||||
When review cancelled/deleted/rejected |
Optional. Specifies what action to perform when a review corresponding to a pull request was cancelled, deleted or rejected. Do nothing: Do not perform any action. Decline pull request: Decline pull request that corresponds to a review. |
||||||
Auto assign reviewers |
Whether to assign Collaborator reviewers when some specific users were added as pull request reviewers on the Bitbucket side and integration can match those Bitbucket users with Collaborator users. |
||||||
Reopen a review when |
Optional. Specifies in what cases Collaborator should reopen completed reviews. May include any combination of the following:
|
Review settings
Setting |
Description |
Default review template |
Optional. Specifies the initial template that will be chosen when creating review (if set to "None", the first template in the list will be chosen). The value of this setting overrides the value of Default review template setting specified on group level. |
Click the Create for selected button or the Create for all button to create repository integrations and automatically create webhooks for each repository in Bitbucket. To stop suggesting integrations for some specific repositories, select these repositories in the list and click Ignore selected.
For every repository a separate configuration will be created in Collaborator and a webhook will be added in Bitbucket.
Now you need to link some Collaborator user account to the Bitbucket account of repository owner.
Creating Bitbucket configuration via the Configure Remote Systems tab
| 1. | Open the Collaborator login page in a browser and log in to Collaborator as an administrator. |
| 2. | In Collaborator, go to Admin > Integrations > Repository Hosting Services |
| 3. | Switch to the Configure Remote Systems tab. |
| 4. | In the New Remote System Configuration section, select Bitbucket and click Create. |
| 5. | Collaborator will display a page with configuration settings. Specify settings in the following sections: |
Bitbucket settings
Setting |
Description |
Title |
Required. The configuration name as it will be displayed in Collaborator's user interface. |
Bitbucket repo URI |
Required. The URI of Bitbucket repository to be tracked. For instance: https://bitbucket.org/jakenherman/awesome-java Both Mercurial and Git repositories are supported. You should copy the repository URI from the browser's address bar, rather than from the repository's clone URI. |
Email address for authentication |
Required. Specifies user's email address to use for authentication. |
API token |
Required. The API token for the Bitbucket account to be tracked. Read API token on Bitbucket documentation to learn how to create API token. For integration with Collaborator you need to enable Read, Write, and Admin permissions for Repositories category and Read and Write permissions for Pull requests and Webhooks categories. |
Webhook status |
Indicates current status of repository webhook: Webhook is absent - A webhook is not created. Webhook isn't active - A webhook is created, but is inactive. Up and running - A webhook is active. To create or activate a webhook, you can press the Update webhook button.
|
Branches
Setting |
Description |
Branches to track |
Optional. The names of branches to track changes and create reviews on pull requests and direct pushes. Separate multiple branch names with commas. You may use Java-style regular expressions to match specific branch names, or you may use the '*' wildcard (alone, or separated by comma) to match all branches. If this field is empty, main branch in the repository will be tracked ("main" for Git repositories and "default" for Mercurial repositories). |
Ignore pushes for branches |
Optional. Specifies branches for which Collaborator will not create reviews on direct pushes. You can enter one or several branch names. Separate multiple branch names with commas. You may use Java-style regular expressions to match specific branch names, or you may use the '*' wildcard (alone, or separated by comma) to match all branches. |
Pull request actions
Setting |
Description |
||||||
Create review automatically |
If enabled, reviews for pull request are created automatically. If disabled, user can add pull request to a review manually through Remote System links, by API call or by special command directly from pull request. |
||||||
When review completed |
Optional. Specifies what action to perform when a review corresponding to a pull request was accomplished. Do nothing: Do not perform any action. Merge pull request: Merge pull request that corresponds to a review. Merge pull request and close its branch: Merge pull request that corresponds to a review and then close the respective branch. Squash pull request: Squash and merge pull request that corresponds to a review. Squash pull request and close its branch: Squash and merge pull request that corresponds to a review and then close the respective branch. Merge and fast forward pull request: Merge and fast forward pull request that corresponds to a review. Merge and fast forward pull request and close its branch: Merge and fast forward pull request that corresponds to a review and then close the respective branch. To learn more about pull request merge strategies, see Bitbucket documentation. |
||||||
Allow users to select merge strategy in review |
If enabled, regular users would be able to choose pull request merge strategies in each separate review. If disabled, all pull requests would behave as specified by the "When review completed" setting. |
||||||
Wait for signature (if enabled) before merge |
Optional. Effective, if any of merge actions (merge or squash) was selected in "When review completed" setting. If enabled Collaborator will wait for the completed review to be signed off before merging the respective pull request. Otherwise, pull request will be merged immediately, even if the review have not been signed yet. |
||||||
Allow to complete review with conflicts in pull request |
Should it be possible to complete a review if there are conflicts in the respective pull request. |
||||||
When review cancelled/deleted/rejected |
Optional. Specifies what action to perform when a review corresponding to a pull request was cancelled, deleted or rejected. Do nothing: Do not perform any action. Decline pull request: Decline pull request that corresponds to a review. |
||||||
Auto assign reviewers |
Whether to assign Collaborator reviewers when some specific users were added as pull request reviewers on the Bitbucket side and integration can match those Bitbucket users with Collaborator users. |
||||||
Reopen a review when |
Optional. Specifies in what cases Collaborator should reopen completed reviews. May include any combination of the following:
|
Review settings
Setting |
Description |
Default review template |
Optional. Specifies the initial template that will be chosen when creating review (if set to "None", the first template in the list will be chosen). The value of this setting overrides the value of Default review template setting specified on group level. |
Click Test connection to verify if you entered data correctly.
| 6. | After you specified the values, click Save. This will create a configuration for the Bitbucket repository. |
| 7. | Click on Update Webhook button to add webhook for that repository on Bitbucket side. |
Now you need to link some Collaborator user account to the Bitbucket account of repository owner.
To learn more about webhook settings on the Bitbucket side, see Bitbucket documentation:
https://confluence.atlassian.com/bitbucket/manage-webhooks-735643732.html
Creating Bitbucket auto-polling configuration
Sections above describe how to add integrations for existing repositories. When some new repositories are created on a server, you may integrate them manually. Alternatively, you can setup Bitbucket auto-polling configuration that will periodically look for new repositories on the specified server, user, workspace or project and suggest creating integrations for them.
| 1. | Log in to Collaborator as administrator. (To integrate with Bitbucket repositories, you need administrator privileges in Collaborator). |
| 2. | On the Collaborator main toolbar, click ADMIN, and then select Repository Hosting Services from the tree on the left. Then switch to the Repository Auto-Polling tab. |
| 3. | On the tab, select Bitbucket in the Add configuration box and click Next: |
| 4. | Collaborator will displays a page with connection details. 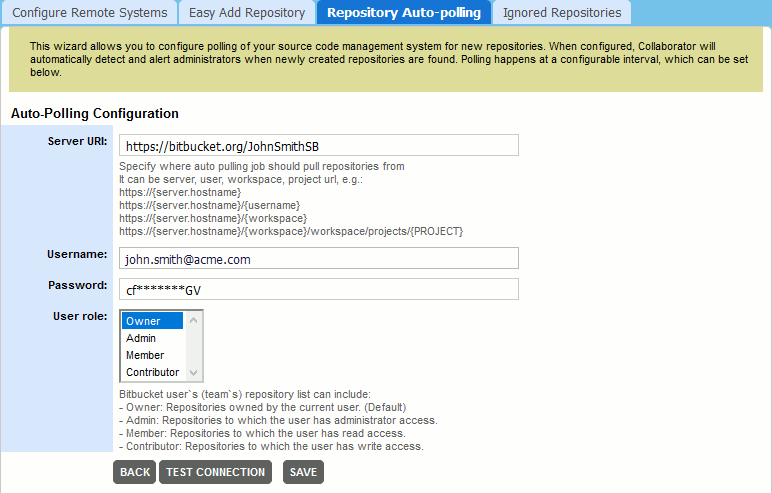 Fill in the edit boxes: |
Setting |
Description |
Server URI |
Required. The URI of Bitbucket server, user, workspace or project to be polled for new repositories. |
Username |
Required. Specifies the user account name for single-user repositories, or an account name to use for authentication in Team repositories. |
Password |
Required. The password for the Bitbucket account to be tracked. |
User role |
Optional. Defines which types of repositories to track. Owner: Repositories that are owned by the specified user. (Default) Admin: Repositories to which the user has administrator access. Member: Repositories to which the user has read access. Contributor: Repositories to which the user has write access. Webhooks will be created for those repositories where allowed by the repository permissions for the specified user. |
After specifying these values, you can click Test connection to verify if you entered data correctly.
| 5. | After you specified the values, click Save. This will create an auto-polling configuration and display it in the Auto-Polling Configurations List. |
| 6. | Scroll down the Repository Auto-Polling tab and check that the Enable Auto-Polling setting is on and optionally change the Auto-Polling Interval setting. |
Now Collaborator will automatically check if any new repositories were found on the specified server. Once found, it will notify administrators and suggest creating integrations with these newly created repositories via the Easy Add Repository wizard.
Enable/Disable Bitbucket Integration
Once a new repository configuration is created, it is enabled automatically. However, you can enable and disable integration with Bitbucket servers manually. To do this:
| 1. | Navigate to the Admin > Integrations screen. |
| 2. | Locate the Enable Bitbucket Integration setting and change it to Yes or No, respectively. |